Tuesday 10 December 2013

Android on vmware

Yippee!! I deployed my virtual machine with android.

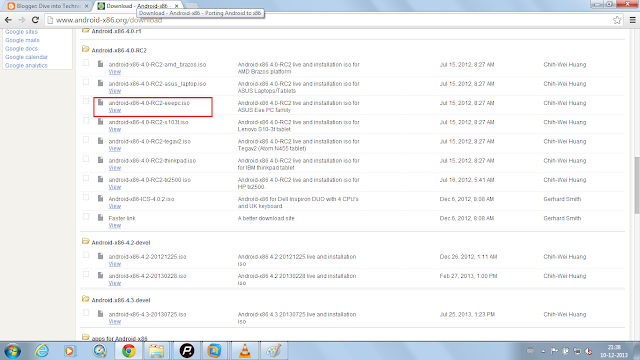
It might sound "What is there in it?" But this is my first time I tried it and it was successful. I would like to summarize it here for all those first-handers wondering how to do the same.

1. The first and foremost thing needed to deploy you need the iso. It is mostly observed that android-x86-4.0-RC2-eeepc.iso is well suited for vmware and 4.2 is well suited for virtualbox. The iso can be downloaded from
                               http://www.android-x86.org/download

In this post I will be covering in detail installation in vmware (and hence 4.0). The iso is a 179Mb file. 

2. Once the iso is downloaded, the vm can be created. Start vmware and perform the following. 
a) 

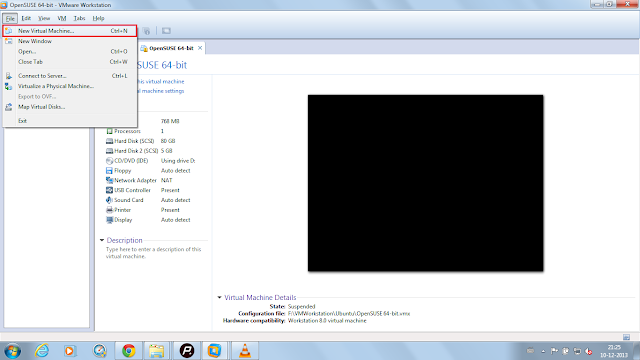
b) Select Typical configuration, which is enabled by default. 

c) Choose installer Disc image file and give path of iso. 

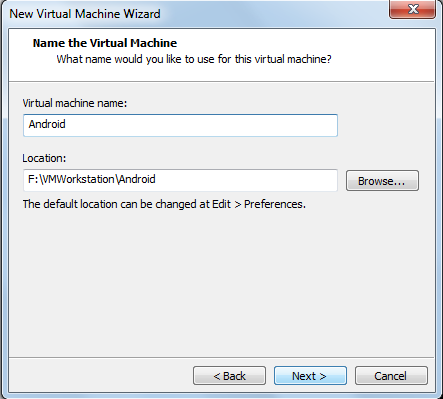
d) Give the name of the virtual machine and path. 

e) Give the Maximum disk size. 

f) In the next window, unselect "Power on this virtual machine after creation"
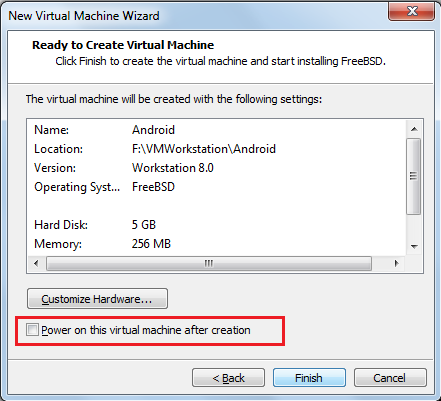
And click finish. The vm will be created. 

g) once this is done, go back to the path that was set in point (d). There will be virtual machine configuration file (vmx file)

Open this file with notead. 

There will be an entity, ethernet0.virtualDev = "e1000"
Change this to ethernet0.virtualDev = "vlance"

save this file. 

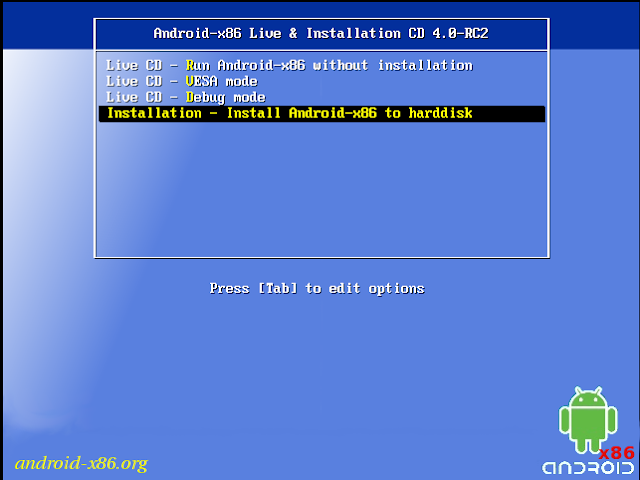
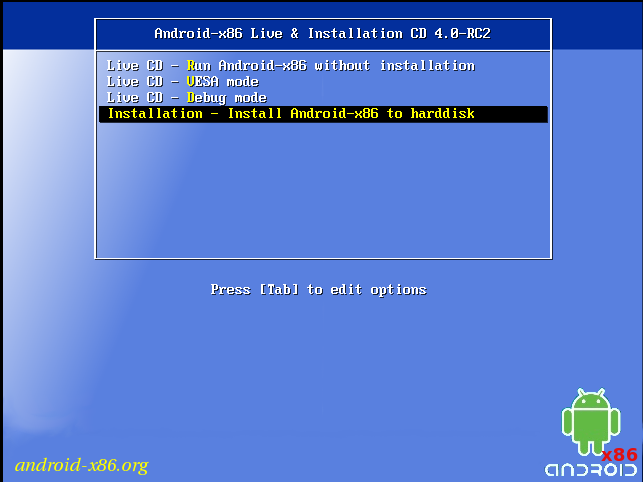
h) Go back to vm and power it on.

i) Select Install android-x86 to hard disk

j) Partition related menu will appear. Select create/Modify partitions option. 

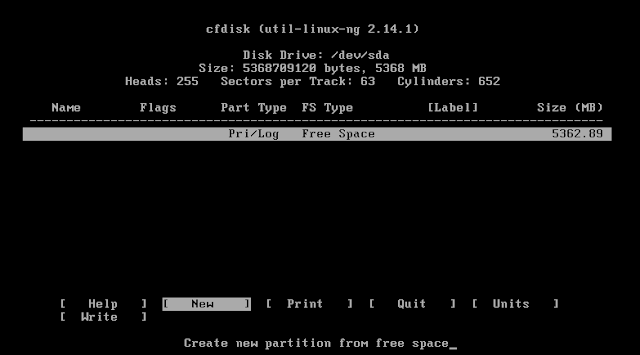
k) This will open a cfdisk utility
Select New

Then select Primary in the next set of options. Then input the size. Then select the bootable flag. 
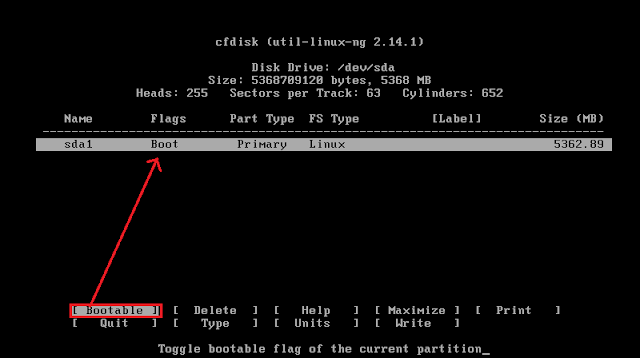
Then select "write"
Select "Quit"to come back to ""Choose partition"window as shown in point (j). The only difference will now be that the partition you added will now be available in that window. 

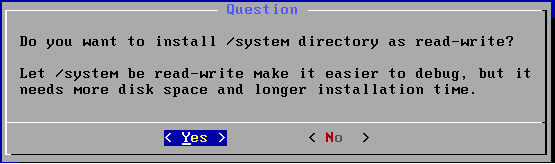
l) Format the partition with ext3 file system. 
There will be questions like "Do you want to format?"etc. Please select yes. 
For setting read/write permission, select yes. 

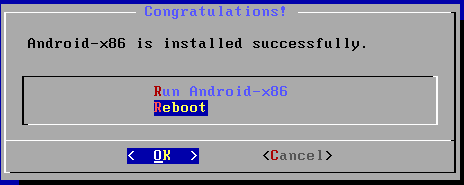
m) After this, select reboot in below screen. 

This finishes deployment. 

But for usage, some more customization are to be done, which are listed below. 
a) The following screen will appear after deployment. 

Click on "Start"

b) Press "Next"for the date and time setup. 
c) Make sure you do not sign in to google account as yet.
d) Give a name to the owner of the tablet and click next
e) Agree to the google terms and services and click next
f) Click finish

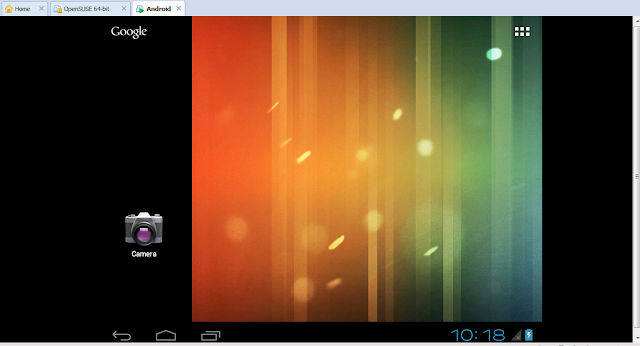
Your vm is up and ready with android. 


Network Setup:

1. Open terminal emulator
2. Do su and give root access to terminal emulator.
3. Open /etc/init.sh file and append the following line
             setprop net.dns1 8.8.8.8
4. Reboot the machine.  

Now your android on VM is set and you can even access web pages. 

Hope this was useful. 

Thanks, 
Gomathi

Saturday 26 October 2013

Linux Test Project - LTP - A Brief

LTP

LTP is an open source project used for testing a linux kernel. The test suites can be written in c, shell or perl. In this post, I will try to explain my understanding of LTP and a sample test case that I will write and execute using LTP.

Download the source from
http://sourceforge.net/projects/ltp/files/LTP%20Source/ltp-20130904/
Upon going to the parent directory of this, You can find out more recen sources of LTP. As of now the above link is the latest suite.

WHAT LTP CONTAINS
There are test cases inside LTP and a test driver called as "pan".
Once the source is extracted, LTP can be viewed as follows.
SCRIPTS
a) IDcheck.sh -> Creates the groups and users required for running LTP
b) runltp -> main script that is used for executing LTP. It  has ability to execute tests related to Sub systems of linux kernel, commands, system calls.
c) Networktest.sh -> To verify features related to network
d) diskio.sh -> verifies disk IO related tests.

DIRECTORIES
a) scenario_groups ->has files which has groups of SCENARIOS to be tested like fs, mm, io, commands, syscalls etc.
b) runtest -> For each scenario described in scenario_groups, these is a corresponding file inside runtest directory which has the Test cases. The format of this file is <TEST CASE TAG> <TEST EXECUTABLE NAME> <Arguments if any>
c) testcases/bin -> This directory consists of each <TEST EXECUTABLE> defined in previous point.
d) testscripts -> contains the scripts that can be used for usage of runltp. Eg : ltpstress.sh etc.

COMPILE AND INSTALL LTP
Once the source is downloaded, perform the following.
1. untar
2. ./configure
3. make
4. sudo make install (will be installed in /opt/ltp)

EXECUTING DEFAULT TEST CASES
1. cd /opt/ltp
2. ./IDcheck.sh
3. sudo ./runltp -p -o output.log -f commands

Point 3 illustrates a sample execution of a particular sub sytem/feature in LTP.

WRITING CUSTOM TEST CASE AND EXECUTION


This is a sample program.
The customized test script can be added in /opt/ltp/testcases/bin/ folder
To execute this script it has to be added in one of the run test files Eg : runtest/commands and the format of this file is

Then this runtest can be executed using
         sudo ./runltp -p -o output.log -f commands

The output will be as shown below

and the output log will be of the following format

In Similar way .c file also can be compiled, added and executed.

Thanks,
Gomathi

KMEMLEAK

KMEMLEAK

Kmemleak is a feature of kernel, that helps in finding the memory leaks in kernel. It only reports the list of memory leaks in the kernel. There is a similar tool to find out memory leaks in user space which is called as Valgrind.

Memory leaks happen when some memory is allocated but not freed. In precise, there is no way to de-reference a particular portion of memory or there is no pointer pointing to that memory using which it can freed.

REQUIREMENTS

To use this particular tool, the kernel has to be built with kmemleak support. In this post, the steps to enable a kernel and ways of identifying and analyzing a leak will be discussed by writing a module that intentionally introduces kernel memory leak.

In the kernel CONFIG_DEBUG_KMEMLEAK is to be enabled. This can be done by doing following.
    From the source directory,
            make menuconfig


Once this configuration is enabled, Set the early log values in Maximum kmemleak early log entries. By default this value is set to 400. But this might not be sufficient in some cases and hence kmemleak might not work as expected. It is better to set this value to a safe 4000.

After setting these kernel configurations, save and quit. In order to detect kernel memory leak, we can write a small piece of code with a memory allocated but not freed. For reference, please use mm/kmemleak-test.c

Then the kernel can be built and booted by using the following steps.
    a) make
    b) make modules
    c) make modules_install
    d) make install
    e) update menu.lst or grub.cfg if make install doesn't automatically do it.
    f) Boot your machine with this particular kernel.

Once the board comes  up you can verify that this is your kernel by the following,
    a) uname -r (You can check the kernel version, if you have used source of a different version)
    b) zcat /proc/config.gz | grep KMEMLEAK (can be verified to check if kmemleak is enabled or not)
    c) If /proc/config.gz is not available you can check cat /boot/config-<kernel version> | grep KMEMLEAK
    d) dmesg | grep -i kmem

After confirming that the deployed kernel is kmemleak enabled, we can start our kmemleak testing and analysis.

To begin with we need to mount debugfs file system. (mount -t debugfs nodev /sys/kernel/debug). KMEMLEAK enabling in kernel will by default do this step and the mount can be done if it is not done automatically. /sys/kernel/debug/kmemleak file will be automatically created which will be our single point of reference for testing and detecting kernel memory leaks.
Multiple options can be passed to this particular file. But most commonly used ones are "scan"and "clear".
Upon doing echo clear > /sys/kernel/debug/kmemleak, all the data will be cleared off. echo scan > /sys/kernel/debug/kmemleak will scan the entire memory and will give information of the kernel memory leaks.
After a scan is performed, cat /sys/kernel/debug/kmemleak will list all the kernel memory leaks at that system state. It also gives a back trace which helps the programmer identify the point where leak happens and helps in fixing the same.
This gives following information
    a)The insmod created memory leak.
    b) The unreference object (leaked memory) is at 0xffff880012f20480
    c) The back trace shows that the leak happens in init function of the module that was inserted.
    d) The kmem_cache_alloc_trace in the bbacktrace shows that a memory is being allocated using one of the malloc variants and is not freed.
This gives all necessary information to fix this leak.

The scan will be performed every 10 minutes by default. But this value of 10 minutes can be modified using echo scan=<secs> > /sys/kernel/debug/kmemleak. All other options supported are
  off           - disable kmemleak (irreversible)
  stack=on      - enable the task stacks scanning (default)
  stack=off     - disable the tasks stacks scanning
  scan=on       - start the automatic memory scanning thread (default)
  scan=off      - stop the automatic memory scanning thread
  scan=<secs>   - set the automatic memory scanning period in seconds
                  (default 600, 0 to stop the automatic scanning)
  scan          - trigger a memory scan
  clear         - clear list of current memory leak suspects, done by
                  marking all current reported unreferenced objects grey
  dump=<addr>   - dump information about the object found at <addr>

To disable kmemleak during boot up, kmemleak=off should be passed in the kernel command line parameter. 

HOW IT DETECTS

The following things happen when kmemleak is enabled in the kernel. 
Whenever a kernel memory is allocated, the pointers are added to a prio search tree and when free is performed this is removed. During a scan, the memory is verified if there is any pointer is available that can free it. If not the memory is considered to be orphan or leaked. 

The best place to get reference is Documentation/kmemleak.txt inside the kernel source.

Thanks,
Gomathi

Thursday 24 October 2013

Interview Experience - PART II

Questions in C

1. What are static variables and static functions?
2. How to use a function in a file which is defined as a static function in a different file? (Function pointer)
3. A header file is written and included in two .c files. What is the problem in it? - Multiple definition of functions.
How can this be resolved?? (There are no problems when stdio.h is included multiple times. How is that possible?)
4. Given a string, find the number of occurrences of a sub string and print only those words that contain this sub string.
5. Write a program for pre-order traversal of a binary tree using recursion.
6. write a program for binary search in a tree.
7. Assign all the alternate bits of an unsigned short to an unsigned char.
8. What is the different stages of compilation of a c file?
9. What is the content of a .o file?
10. How to pass a command line argument to change a macro?
11. What is the difference between a MACRO and inline function?

Questions in LINUX

1. Write a simple Makefile
2. What all files will be packed in run time rpm, devel rpm.
3. How to add run time rpm as dependency to devel rpm in rpm spec file?
4. Why and when use cross compiler?
5. What is the difference between printf and write? (between library functions and system calls)

Thursday 19 September 2013

Interview Experience

I am sharing here some of the interview questions that I faced in this post.

C
1. What is volatile and why is it used?
2. What is the necessity for a const qualifier?
3. What is little Endian and big Endian? Write a code to convert little endian to big endian and vice versa.
4. Write a single line macro to do the above conversion
5. Declare a structure.
6. Structure has been declared with int; char; int; char members in same order. What is the size allocated for it in memory? Is there a way to optimise it?
7. Implement a stack using linked list.
8. String copy without using default functions from string.h
9. How to toggle a bit in a number?
10. Convert decimal to binary
11. Verify if a linked list is a palindrome or not.
12. What will happen if there is
main()
{
printf("Hello");
while(1);
}
13. What is the difference between char * const ptr, char const * ptr and const char * ptr??
14. What are preprocessor macros?
15. What is compilation and linking?
16. Is a global variable extern?
17. Can a static variable be made extern?
18. What are static variables and static functions?
19. Is a MACRO advantageous or a function?
20. What is difference between macro and inline function?
21. Reverse a linked list.
22. Find the middle element of linked list in a single traversal.
23. What are the differences between malloc and calloc?
24. Where are static and global variables stored in the memory?
25. How can a multi threaded application be written?

Linux
1. What is a kernel?
2. What is difference between user space and kernel space?
3. Why kernel mode of operation is required?
4. What happens when a system call is made?
5. How a kernel can be live patched? (Ksplice)
6. sed related, awk related question
7. how to write a module?
8. How to write a system call? steps
9. How the boot time of an embedded machine can be reduced?
10. How are embedded distribution different from regular distributions?
11. rpm and all its options
12. patch and all its options
13. How to debug a shell script/binary?
14. what are different mechanisms of inter process communications?
15. What is procfs and sysfs?
16. The ways to set ip for an interface.
17. What all kind of tests LTP covers?
18. What is the need of asmlinkage?
19. How many arguments can be passed to a system call?
20. yocto related questions.

Agile
1. TDD
2. Iterative model

I have added all the questions that I could remember. As and when I remember, I will update the post.

Thanks,
Gomathi

Wednesday 18 September 2013

Linux Boot Process - Step by Step

Linux Boot process is the process that happens right from power on until a shell appears for an user to start working on. Here I try to explain the process step by step.

1. Once the system is powered on, the control is taken by BIOS(Basic Input Output System).
2. This system triggers POST. POST is Power On System Test. It verifies that all hardware that are connected to the system are working fine.
3. If the verification succeeds, a bootable device is searched for. The bootable device could be a USB stick, a partition in hard drive, a CD ROM, via network etc.
4. When the bootable disk is identified, MBR is loaded from it. MBR is nothing but the Master Boot Record, which occupies the first sector (512 bytes) of the bootable device. Out of these 512 bytes, first 446 bytes consist of the primary boot loader information, next 64 bytes store the partition table information and the last 2 bytes store the magic for validating the MBR.
5. The MBR loads itself to the RAM and starts searching for the active partition. It also verifies no other partition is active at that point of time. It loads this in the RAM. In nut-shell it transfers control to GRUB.
6. The Grub (or earlier days it was lilo) uses /etc/grub/grub.cfg  file. It opens a boot menu, which lists the set of available distributions for deployment based on grub.cfg. If nothing is selected in this menu, the distribution which is specified as ddefault in grub.cfg will be deployed on the system.
7. After the decision of which distribution is to be deployed, an attempt is made to search for the kernel in the predetermined path. It will be zImage (Compressed, less than 512 Kb) or a bzImage(Big compressed, more than 512 Kb).
8. The head of this image itself will have some code that can
           a) Setup hardware
           b) Decompress the kernel image
           c) Copy the kernel to the memory.
9. Once the kernel is loaded into the memory,
           a) It initializes the memory and configures hardware that are connected to the system
           b) It finds the Initrd, decompresses it and mounts the Initrd.
           c) It then loads the kernel modules/device drivers.
           d) Initializes virtual devices.
After all this the smaller Initrd, which was used for bringing up the board is unmounted and the actual initrd is pivot_root ed. Some times it is possible to embed a small Initrd which contains only the bare essentials to bring up the board inside the kernel itself.
10. With this stage, The kernel is loaded and initialised. Now the control is transferred to user space.
           a) The first thing started in user space is /sbin/init. It runs with a PID 1
           b) Then /etc/rc.d/rc.sysinit script is executed.
           c) The /etc/inittab is executed. This is a special file, which spawns/starts services (like for console logging, syslog etc). Here the run level can also be mentioned.
           d) Then all the services i /etc/rc.d/rc<RUN LEVEL>.d is started.
           e) The last step is execution of /etc/rc.d/rc.local. This script can be very useful if we need to customise the start up procedure.

Once all this is done, Shell is available for the user to start using the system.

Thanks,
Gomathi

Linux Kernel Module : Internals of insmod and rmmod

The post intends to explain the internals of a kernel module and the way insmod and rmmod utilities work.

Internals of a kernel module 
         The kernel module is a dynamically loadable section of the kernel. It means it is a piece of kernel code which can be added to the running kernel when loaded and can be removed from kernel when the functionality is not required.
         To do so, the kernel configuration of the object is to be made as m, ie., CONFIG_<object> = m in the .config of the kernel build directory. To be more precise, the object has to be given as obj-m in the Makefile.
         This configuration and building will provide a .ko which is nothing but the kernel module. Many device drivers can be written this way, so that they can be loaded only when necessary and can be removed otherwise. This reduces the actual size of the kernel image.
         The loading of a kernel module can be performed by insmod or modprobe utilities, whereas unloading can be done by rmmod utility. These utilities are supported as part of busybox package and module-init-tools package. The busybox commands will not have all the features and options supported. Hence module-init-tools can be installed. If there is a constraint on size, the busybox package itself can be used for basic functionality.
          The kernel module after compilation is nothing but an elf file. It will have .text section for the instructions, .data for the data, .bss section for uninitialized data, .init.text for module_init function of a module, .exit.text section for the module_exit function of the module and .modinfo section which has all the macros.

How insmod works
1) Insmod is a small program, which calls init_module() to intimate the kernel that a module is attempted to be loaded and transfers the control to the kernel.
2) In kernel, sys_init_module() is run. It does a sequence of operations as follows
    a) Verifies if the user who attempts to load the module has the permission to do so or not.
    b) After verification, load_module function is called.
        b.1) The load_module function assigns temporary memory and copies the elf module from user space to kernel memory using copy_from_user.
        b.2) It then checks the sanity of the ELF file (Verification if it is a proper ELF file etc)
        b.3) Then based on the ELF file interpretation, it generates offset in the temporary memory space allocated. This is called the convenience variables.
        b.4) User arguments to the module are also copied to the kernel memory
        b.5) The state of the module is updated to MODULE_STATE_COMING
        b.6) The actual location in the kernel memory is allocated using SHF_ALLOC
        b.7) Symbol resolution is done.
        b.8) The load_module function returns a reference to the kernel module.
    c) The reference to the module returned by load_module is added to a doubly linked list that has a list of all the modules loaded in the system.
    d) Then the module_init function in the module code is called.
    e) Module state is updated to MODULE_STATE_LIVE

How rmmod works
1) rmmod calls delete_module which hints the kernel that an rmmod request has come in and the control is transferred to kernel.
2) The sys_delete_module() is called in the kernel. This does following operations.
     a) Checks if the user who attempts to remove the module has the permission to do so or not.
     b) Checks if any other module that is loaded is dependent on the module attempted to be unloaded. This information can be obtained from the modules_which_uses_me list.
     c) Checks if the module is actually loaded or not in the kernel. This is done by verifying if the current state of the module is MODULE_STATE_LIVE.
     d) It executes the module_exit function written in the module code.
     e) Then free_module function is called, which does the following.
          e.1) Removes any sysfs references of the module
          e.2)Removes all the kernel module object references.
          e.3) Performs architecture specific clean up if any.
          e.4) Unloads the module from kernel
          e.5) Updates the state of module to MODULE_STATE_GOING
          e.6) Frees the memory used by user space arguments for the module.


I sincerely hope that this blog gives a detailed understanding of insmod/rmmod utilities. Please feel free to correct me if any of the above information is incorrect or if it can be elaborated.

Thanks,
Gomathi

Wednesday 7 August 2013

Set up your Ubuntu 13.04

Hi,

In this post I will explain all the steps that i did to set up my ubuntu 13.04

1. Install vmware and create a virtual machine.
It is always better to have more hard disk size, if you are setting up linux in vm. I gave 80Gb.

2. Insert the DVD of ubuntu and power on the newly created VM. The installation is very simple. Please answer the questions that appear on the screen, like language/time zone etc. Once installation is done, this vm needs to be restarted.

3. After the installation is successful, open terminal and install ssh package
# sudo apt-get install ssh

4. Start the ssh server
# service ssh start

5. After this you will be able to use putty to connect to your vmware.

6. Install samba in your linux machine or winscp in your windows machine
# sudo apt-get install samba
# service smbd start
# sudo smbpasswd -a

You can download winscp from http://winscp.net/download/winscp516setup.exe

7. Create an iso image using k3b software, so that you don have to depend on DVD/CD always.

Thanks,
Gomathi

Tuesday 30 July 2013

YOCTO - my understanding

Yocto - Its all Open source... oh wow!! That is what people exclaimed about.
To me... Yocto?? What is that??

Later I started building my understanding in the yocto and now it is my dream to establish career in or towards yocto.

In embedded OS, building image and packaging them is very important and different companies use their own build frame work to do the same. Being a part of such a team, I would admit I had some knowledge in packaging concepts. Then I was opened up to yocto.

Yocto is end to end frame work to create such images for Embedded devices. Mind it, I did not mention it as Build frame work but just mentioned it  as a framework. Of course It also has a build framework in it(which is called POKY) but that is not all.

Yocto comprises of build framework, packaging features and many more advanced features. All leading companies starting from Intel and Windriver, feel proud to be elusive members of yocto community.

Yocto has also started delivering kernel. In addition it also has virtual deployment utility - qemu. Yocto also has some test frameworks inside it. If you want anything more, it is very simple to plugin your utility with yocto and start using it. And hence in a nut-shell, it can be claimed as yocto has it all.

This is the best place for anyone new to start with
http://www.youtube.com/watch?v=zNLYanJAQ3s

Other references about yocto can be found at
https://www.yoctoproject.org/docs/current/yocto-project-qs/yocto-project-qs.html
http://www.yoctoproject.org/docs/current/dev-manual/dev-manual.html
http://en.wikipedia.org/wiki/Yocto_Project

Bugs in yocto can be looked at
https://bugzilla.yoctoproject.org/

This post is just to make the name "yocto" familiar.
I will post detailed findings in upcoming posts.

Thanks,
Gomathi

Thursday 25 July 2013

Writing a linux system call

WHAT IS A SYSTEM CALL?

System call is an interface (the only interface) between user space and the kernel. It is more than a normal function. It creates a trap (soft interrupt) to make the kernel perform a specific task.

Examples of System call

The applications we use might use many system calls. But as a person with limited experience we might not be aware of this fact.
Some examples include - open, chown, seek etc.

Can I write my own system call?

Of course, we can. This is the beauty of it and the same can be stated as "kernel programming":)

How do I write a system call?

It is quite simple in latest Linux kernels, unlike the older ones (2.6 and older).
The steps are elaborated below.

1. Get the source of your kernel tree.
2. There is a syscall table in the kernel, which is specific to architecture.
<kernel>/arch/<architecture>/syscalls/syscall_32.tbl
This table contains the ID of system call, its name and its function name. Add your system call entry in this file. Please make sure that you give a unique ID number to your system call based on the current number of system calls.
3. Add the prototype of the system call in include/Linux/syscalls.h file.
4. Add the system call definition in any file (new or can be appended in existing file). In case of a new file. Make necessary modification in the Makefile of parent directories recursively, until this file is treated for compilation.
NOTE : in steps 3 and 4, asmlinkage is to be done.
5. Once these modifications are done, Compile this kernel and deploy the image
a) make menuconfig
b) make
c) make modules
d) make modules_install
e) make install

6. make install will take care of copying kernel image to /boot directory and to update grub configuration.
7. reboot. Select your kernel image during board bring up.
8. Write an application that will invoke your system  all and verify that your system call exists, it is called and it works as u intended it to.
This can be done by syscall(<SYSCALL ID>,<Parameters if any>)

What else should I remember?

1. The system call can return a value and can get arguments.
2. The number of arguments that can be passed to the system call is specific to the architecture.
This is because each architecture support different number of registers. Eg : x86 supports 6 registers.
3. Because of the above difference specific to architecture, the number of system calls for same kernel version might differ from architecture to architecture.
4. Although the usage of most of the common syscalls are still the same.
5. The syscall can get parameters of size of upto unsigned long int. (size of register dependent).


Monday 15 July 2013

LINUX : fdisk

My first blog!!

A new learning that I received today. It is about the command fdisk.

This is a Linux command, that can be used for creating/deleting partitions.
It is abbreviation of "Fixed disk"

fdisk has command line options.

The list of all available partitions can be obtained by fdisk -l

Add an hard disk in your vm, reboot the machine and do the following,

fdisk -l
fdisk
=> n
Select primary partition. Give partition number, size.
Same way create extended partition if necessary.

=>wq
save and quit

To delete a partition, You can use
=> d
and give appropriate partition number to delete

To make the created partition usable, a file system is to be created in this partition. This can be done by mke2fs command.

you can also create ext3 file system using mkfs.ext3 command. Same way can use corresponding binaries for creating ext2, ext4 etc.

Then this partition can be mounted on a folder structure.

Eg :
mount -t ext3 <your partition> <folder where it has to be mounted>

Thanks,
Gomathi